
This page explains how to ‘unmirror’ your video, so that handwriting and printed text appears legibly, not backwards.
Contents:
§ I want to show work to my students
§ I want to show work to my students
This § explains the procedures for unmirroring your own video, so that your students can see your handwriting and text correctly.
• I’m using Zoom
==== OPTION 1 ====
If you need the functionality of the Zoom app (as opposed to hosting a Meeting from a web browser), then you can use Share Screen to share your computer’s built-in app for accessing the webcam.
These videos show you the steps for your type of laptop:
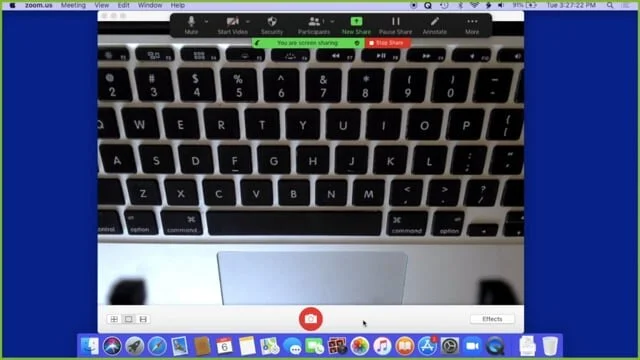
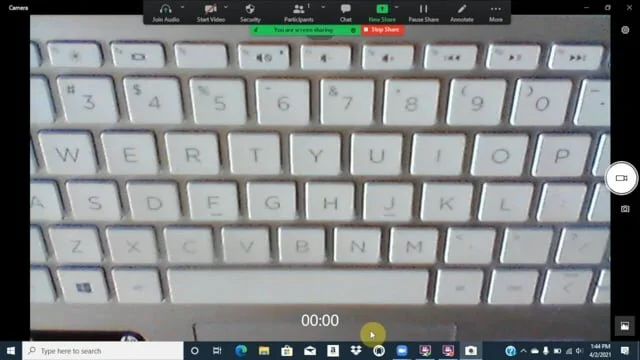

Step 1 - In Zoom, click the Stop Video button
Step 2 - Launch the Camera app (Chromebook or Windows) or Photo Booth (Mac)
Step 3 - Switch back to Zoom
Step 4 - Click the Share Screen button, to share Camera (or Photo Booth)
==== OPTION 2 ====
If using Zoom in a web browser meets your needs, then there is a Chrome extension called CamFlip that may offer a simpler procedure.
This video shows how you can use it to flip the video you’re sending in your Meeting, by clicking its icon in the Chrome toolbar:

Before using it in Zoom, there is a one-time install that is required.
Click this link: http://CamFlip.net to get this Chrome extension.
Or if you need instructions for installing and pinning a Chrome extension then watch the following video: Installing CamFlip.
• I’m using Google Meet
==== Option 1 ====
To unmirror the video you’re transmitting to your students in Google Meet, you can use a Chrome extension called CamFlip.
These videos show you the steps for your type of laptop:


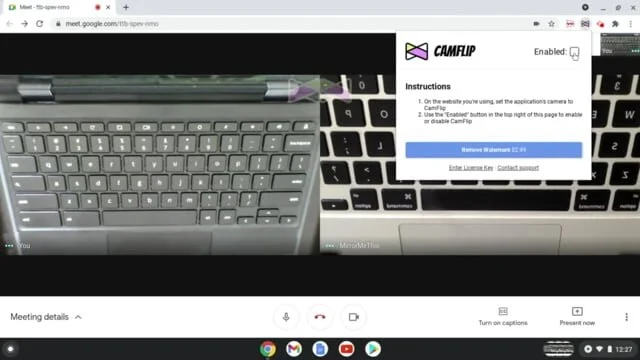
To use CamFlip, a one-time install is required.
Click this link: http://CamFlip.net to get the CamFlip Chrome extension.
Or if you need instructions for installing and pinning a Chrome extension then please watch the following video: Installing CamFlip.
==== Option 2 ====
Alternatively, you can use Share Screen to share your computer’s built-in app for accessing the webcam.
These videos show you the steps for your type of laptop:
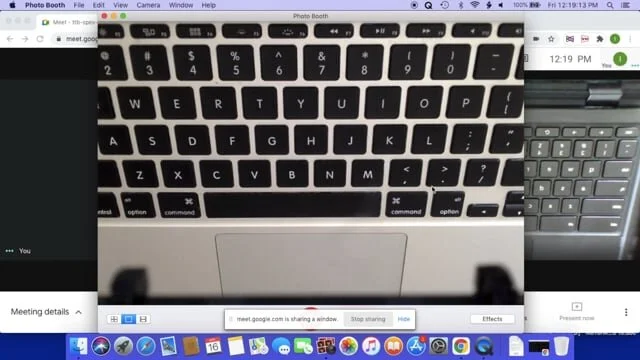


Step 1 - In Meet, click the Turn off camera button
Step 2 - Launch the Camera app (Chromebook or Windows) or Photo Booth (Mac)
Step 3 - Switch back to Meet
Step 4 - Click the Present now button, to share Camera (or Photo Booth)
==== Option 3 ====
If your students are technically proficient, a third option is for them to flip the video you’re sending them on their end, by using a related Chrome extension called VideoMirror. This also requires a one-time install.
This video shows how they can use it to flip the video they’re receiving in your Meeting:

If you want to use this option, there is a one-time extension install that is required.
Click this link: http://VideoMirror.app to get this Chrome extension.
Or watch the following video if you need instructions for installing and pinning a Chrome extension:
Installing VideoMirror.
• I’m using Microsoft Teams
==== Option 1 ====
To unmirror the video you’re transmitting to your students in Microsoft Teams, you can use a Chrome extension called CamFlip.
This video shows you the steps:
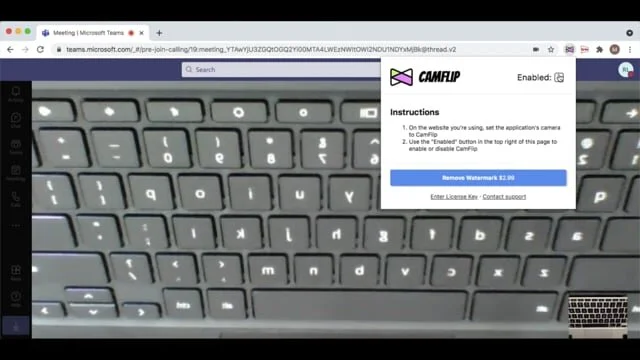
To use CamFlip, a one-time install is required.
Click this link: http://CamFlip.net to get the CamFlip Chrome extension.
Or if you need instructions for installing and pinning a Chrome extension then please watch the following video: Installing CamFlip.
==== Option 2 ====
Alternatively, you can use Share content to share the Camera app.
This video shows you the steps:

Step 1 - In Teams, click the Turn video off button
Step 2 - Run the Camera app
Step 3 - Switch back to Teams
Step 4 - Click the Share content button, to share Camera
• I’m using Webex
(Webex Instructions Coming Soon. Please email us at <info@brightfingers.com> for help.)
§ I want to see my students’ work
This § explains the procedures for unmirroring your students’ video, so that you can see their handwriting and text correctly.
• We’re using Zoom
==== Option 1 ====
The simplest approach for seeing your students’ work is to use a Chrome extension called VideoMirror. Enabling VideoMirror flips your view of every other participant’s video.
So with a single click, all the videos are unmirrored, and your students don’t have to do anything — which may be easier, especially if they are on the younger side. This video shows how VideoMirror works:

The disadvantage to this option is that you have to join the Meeting from your Chrome browser. This means you won’t have the full functionality of the Zoom app.
(See this Zoom support article for details on difference in functionality between Zoom the app and Zoom in a web browser.)
Alternatively, if you have the possibility of connecting to your students using two devices, then you can avoid this disadvantage. You can host the Meeting from one device that is running the Zoom app. And then your other device can be a dedicated VideoMirror device, on which you view all your students’ videos in Chrome with this extension enabled.
If you want to use this option, there is a one-time extension install that is required.
Click this link: http://VideoMirror.app to get this Chrome extension.
Or watch the following video if you need instructions for installing and pinning a Chrome extension: Installing VideoMirror.
==== OPTION 2 ====
If your students can connect to your Meeting using Zoom in a web browser, then there is a related Chrome extension called CamFlip that they can install and use. In this case, they will click the CamFlip icon to enable it on their end, and then you will see their video unmirrored on your screen.
This video shows how they can use it to flip the video they’re sending in your Meeting:

Before using it in Zoom, there is a one-time install that is required.
Ask them to click this link: http://CamFlip.net to get this Chrome extension.
Or if they need instructions for installing and pinning a Chrome extension then ask them to watch the following video: Installing CamFlip.
==== OPTION 3 ====
If your students need the functionality of the Zoom app (as opposed to joining a Meeting via a web browser), then they can use Share Screen to share their computer’s built-in app for accessing the webcam.
These videos show the steps depending on their type of laptop:


Step 1 - In Zoom, click the Stop Video button
Step 2 - Launch the Camera app (Chromebook or Windows) or Photo Booth (Mac)
Step 3 - Switch back to Zoom
Step 4 - Click the Share Screen button, to share Camera (or Photo Booth)
• We’re using Google Meet
==== Option 1 ====
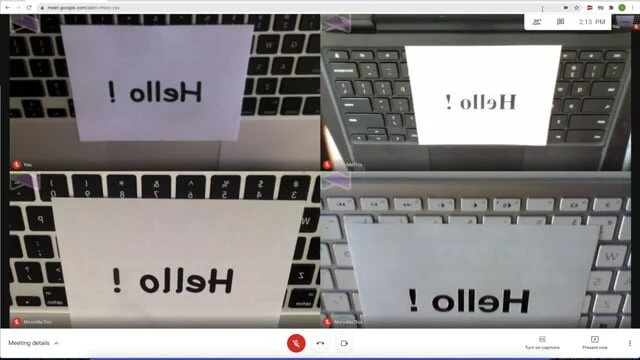
The simplest approach for seeing your students’ work is to use a Chrome extension called VideoMirror. Enabling VideoMirror flips your view of every other participant’s video.
So with a single click, all the videos are unmirrored, and your students don’t have to do anything — which may be easier, especially if they are on the younger side. This video shows how VideoMirror works:
If you want to use this option, there is a one-time extension install that is required.
Click this link: http://VideoMirror.app to get this Chrome extension.
Or watch the following video if you need instructions for installing and pinning a Chrome extension: Installing VideoMirror.
==== Option 2 ====
Alternatively, you they use Share Screen to share their computer’s built-in app for accessing the webcam.
These videos show the steps, depending on their type of laptop:


Step 1 - In Meet, click the Turn off camera button
Step 2 - Launch the Camera app (Chromebook or Windows) or Photo Booth (Mac)
Step 3 - Switch back to Meet
Step 4 - Click the Present now button, to share Camera (or Photo Booth)
• We’re using Microsoft Teams
==== Option 1 ====
To unmirror the video your students are sending you in Microsoft Teams, they can use a Chrome extension called CamFlip.
This video shows the steps:

To use CamFlip, a one-time install is required.
Click this link: http://CamFlip.net to get the CamFlip Chrome extension.
Or if you need instructions for installing and pinning a Chrome extension then please watch the following video: Installing CamFlip.
==== Option 2 ====
Alternatively, they can use Share content to share the Camera app.
This video shows the steps:

Step 1 - In Teams, click the Turn video off button
Step 2 - Run the Camera app
Step 3 - Switch back to Teams
Step 4 - Click the Share content button, to share Camera
• We’re using Webex
(Webex Instructions Coming Soon. Please email us at <info@brightfingers.com> for help.)
§ I want to project to the smartboard in my classroom
If you’re not using a video platform for online / remote / virtual learning, and simply want to project what you’re working on to a large screen in your classroom, then the procedure is quite simple:
On a Mac, open the “Photo Booth” App in your Applications folder.
On Windows, open the “Camera” App from the Start menu.
On a Chromebook, open the “Camera” App from the Launcher.
These Apps will handle the ‘unmirroring’ to whatever display device you have connected to your laptop.
Revised 10/13/2021